Showing posts with label free samp server. Show all posts


Hey There! Have You Ever Wanted free Domains? Well Intuit Gives Free Domains Out, But you must Fill the Details For The Payment. As I am gonna Promise your gonna get Your Domain, But I Shall Warn you! If you make Multiple Accounts, Your Account Can be Deleted.

What you will need :
Gmail  account
Internet Connection 
and a lil bit brain

So Lets Start Shall we?
First of all use any VPn say Security Kiss and select US server and click on connect
after that goto http://www.gybo.com/wisconsin/getonline, To
Register into Intuit. So The Page Should look something like this :


So Click the Continue & You should Redirect to This Page :


So You can Enter an Random Email Adress, But I Suggest you use
yours Just Because I do not want your account to be Deleted.
So Make your User ID & PW & Click Continue.
So Once your in this page :


You want to Click the ”Choose a domain (www.yourname.com)
You can choose any 1 tld
For your Website,

Now Choose a Domain name & Click ”Check Availability”
Now once you Have Chosen it, You should have page like this :


Click the Get Domain Button to Proceed to Next Step.
You will be Redirected to the Page where you must fill
information. You can just use www.fakenamegenerator.com to
Generate the Details or Enter your Personal Details.
I Used
www.fakenamegenerator.com Details,


Now Just Press ”Save & Continue” To Proceed into next step.
So now you will be in this Page, And Information Will be in it. :


So Click Submit.
Now you will be Asked Credit Card Information, But were gonna
find them on Google.
NOTE: YOU ARE NOT GONNA GET CAUGHT TO PAY
0.00$ !
So Write on Google The Following Thing :
Credit Card Dumps
.
Well it Accepts The Following Cards, Mastercard, Visa, Amex,
Discover . So you can find those on google too :)
So I Putted these Details :
Name: Michael Bartlett
Number: 4358802828369933
Exp: 01/20 (01 2020)
CVV: 942
As You have Completed your Payment, You will be Redirected to
This page :


Now just Click The ”Domains” & You Have your Domain in there
Congrats!, Now just Wait Till you Have Full Control Of Your
Domain. Which you can Move or Create It Normally With Intuit.
If You have Questions comment's are Welcome.

Hello friends, Today I came with one of the most beautiful tips about Windows 7. Most of you get bored by using the same interface in your Windows 7 PC. So here I'll give you the Glass interface skin pack for Windows 7.


This free Glass interface skin pack will make your Windows more attractive and colorful. After the installation completes you will feel a fresh mind while working with Windows 7. If you're a Windows 7 user, don't wait anymore. Download the free skin pack and transform Windows 7 to Glass GUI. You can download both 32-bit and 64-bit from following links.
Download Glass Skin Pack for Windows 7 32-bit

Note: Before install this skin pack, uninstall if any other skin pack installed.


Crack Any Adobe Software:

1. Download or install any Adobe software which you want to crack from the original site.

2. Now press Windows Key + R (or go to START and select RUN).

3. Copy “ C:\Windows\System32\drivers\etc ” to the blank space and press enter.
Crack Any Adobe Software Manually

The window will look like the screenshot shown below:

Crack Any Adobe Software Manually

4. You will see a file named 'hosts' , open it in Notepad.


Copy all the codes given below in red color, exactly at the end of the “hosts” file.
>>>>>>
127.0.0.1 hl2rcv.adobe.com
127.0.0.1 adobeereg.com
127.0.0.1 activate.adobe.com
127.0.0.1 practivate.adobe.com
127.0.0.1 ereg.adobe.com
127.0.0.1 activate.wip3.adobe.com
127.0.0.1 ereg.wip3.adobe.com
127.0.0.1 wip3.adobe.com
127.0.0.1 activate-sea.adobe.com
127.0.0.1 wwis-dubc1-vip60.adobe.com
127.0.0.1 activate-sjc0.adobe.com
127.0.0.1 3dns.adobe.com
127.0.0.1 3dns-1.adobe.com
127.0.0.1 3dns-2.adobe.com
127.0.0.1 3dns-3.adobe.com
127.0.0.1 3dns-4.adobe.com
127.0.0.1 adobe-dns.adobe.com
127.0.0.1 adobe-dns-1.adobe.com
127.0.0.1 adobe-dns-2.adobe.com
127.0.0.1 adobe-dns-3.adobe.com
127.0.0.1 adobe-dns-4.adobe.com
127.0.0.1 adobe-dns-5.adobe.com
127.0.0.1 hh-software.com
127.0.0.1 http://www.hh-software.com
127.0.0.1 activate.adobe.de
127.0.0.1 practivate.adobe.de
127.0.0.1 ereg.adobe.de
127.0.0.1 activate.wip3.adobe.de
127.0.0.1 wip3.adobe.de
127.0.0.1 3dns-3.adobe.de
127.0.0.1 3dns-2.adobe.de
127.0.0.1 adobe-dns.adobe.de
127.0.0.1 adobe-dns-2.adobe.de
127.0.0.1 adobe-dns-3.adobe.de
127.0.0.1 ereg.wip3.adobe.de
127.0.0.1 activate-sea.adobe.de
127.0.0.1 wwis-dubc1-vip60.adobe.de
127.0.0.1 activate-sjc0.adobe.de
127.0.0.1 wwis-dubc1-vip60.adobe.de
127.0.0.1 hl2rcv.adobe.de
127.0.0.1 nero.com
127.0.0.1 http://www.nero.com
127.0.0.1 activate.nero.com
127.0.0.1 http://www.activate.nero.com
127.0.0.1 nero.de
127.0.0.1 http://www.nero.de
127.0.0.1 activate.nero.de
127.0.0.1 http://www.activate.nero.de
127.0.0.1 validation.sls.microsoft.com
<<<<<<

Now your hosts file will look like below:
Crack Any Adobe Software Manually

5. Now open your installed software and try registering it with the keys given below in red color. You can also use any other serial from the internet.


Photoshop CS5:
Serial : 1330-1927-7762-6383-0202-0414

Adobe CS5 Serials
Master Suite :
1325-1118-5864-4422-1094-1166
1325-1558-5864-4422-1094-1126
1325-1958-5864-4422-1094-1178
1325-1085-0645-5332-7061-9771
Adobe Photoshop CS5 :
1330-1331-8999-1502-9478-2917
1330-1142-0465-8003-9094-2819
1330-1316-4643-3923-8060-7538
1330-1671-4856-0278-6039-5990
1330-1647-2807-2131-5612-3113
1330-1069-7042-6518-2723-8340
1330-1273-0567-2526-5898-4518
1330-1700-2259-7564-5904-8654
1330-1456-7129-3124-9883-0945
1330-1978-0944-5190-8622-2482
1330-1729-4134-3278-5127-0701
1330-1195-9669-1964-1664-8624
1330-1053-1062-3663-3360-7919
1330-1721-2162-5454-2056-2287
1330-1266-3612-0814-0203-2212
1330-1398-3612-0601-3319-3385
1330-1559-1431-3534-8376-1995
1330-1121-1371-0736-8351-4437
1330-1168-5387-1370-1930-2853
1330-1710-0698-7698-7854-4790
1330-1554-8539-3561-0436-4419
1330-1522-1016-1028-5254-0575
1330-1114-2026-2783-5050-1059
1330-1415-4881-9987-0255-2828
1330-1024-9870-9107-3211-6777
1330-1005-5851-8724-6749-9129
1330-1302-5050-2968-0368-6016
1330-1243-3955-0795-5819-7078


Photoshop :
1330-1927-7762-6383-0202-0414

Fireworks :
1193-1927-7762-6383-0202-0437

Dreamweaver :
1192-1927-7762-6383-0202-0474

Encore :
1132-1127-8739-4724-1356-4304

Soundbooth :
1332-1281-2401-7141-7851-9214

Onlocation :
1132-1434-9226-7415-1756-2046

Contribute :
1188-1001-8428-4361-2308-0839

Adobe Flash Catalyst :
1395-4001-8359-3301-6882-0521

Illustrator :
1034-1006-5290-0019-3090-0219

In Design :
1037-1000-0448-3419-1984-9230
Adobe Creative Suite :
1325-0621-9125-0765-3648-0614
1325-0365-5929-6118-8817-8422
1325-0150-1163-7532-1626-3430
1325-0178-1927-9019-0123-2254
1325-0702-3693-1544-9166-3515
1325-0549-2240-0071-3409-1342


Adobe Creative Suite 5 Design Premium :
1407-1774-6464-0961-5577-3797
1325-1245-8536-3731-5649-0659
1325-1113-0107-7817-6293-2712
1325-1355-9394-6283-9724-7600
1325-1059-7531-1609-0601-5636
1325-1337-3209-8161-8985-5221

Adobe Premiere Pro CS5:
1325-1690-0603-1760-5083-6195
1325-1639-7577-9907-5036-7451

Adobe Lightroom 3 :
1160-4180-1304-4433-8182-0131
1160-4089-8059-2477-5747-3653
1160-4524-3826-2813-1878-0373
1160-4061-6875-7714-1191-2089
1160-4998-8932-9947-2948-1705
1160-4796-6424-4832-1184-5113
1160-4674-7526-7461-7646-0743
1160-4526-3596-3501-4568-7963
Flash :
1302-1009-3696-1065-6850-7951


Thanks to Swapnil Haxor for Such a great Tutorial.


Friends here I present Short and Sweet Tutorial on How To install Armitage On Kali Linux

Missing in Action: Armitage on Kali Linux

As you may know, the highly anticipated Kali Linux is now available. If you’ve fired it up, you may notice it’s missing a familiar tool. Armitage is not present. The Kali Linux team added an Armitage package to its repository today. To get it:

apt-get install armitage

Before you start Armitage, make sure the postgresql database is running:

service postgresql start

If you get a missing database.yml error, type:

service metasploit start


Tutorial By Surya Subhash aka RESISTER

Sony Xperia Z


Product Details

Sony Xperia Z (38990 INR from Flipkart)


Key Features

  • Android v4.1 (Jelly Bean) OS
  • 5-inch TFT Capacitive Touchscreen
  • 1.5 GHz Qualcomm Snapdragon S4 Quad Core Processor
  • 2 MP Secondary Camera
  • 13 MP Primary Camera
  • Water and Dust Resistant
  • One Touch Connect with NFC
  • Full HD Recording
Leaving no stone unturned, the Xperia Z gives you everything you need to make work and play absolutely amazing. To start with, the phone is powered by the powerful 1.5 GHz Qualcomm Snapdragon S4 Pro with 2 GB RAM. To enhance your user-experience on the Sony Xperia Z is the 5 inch TFT capacitive, full HD touchscreen.
Two things you have to love about this screen are the Touch Gesture feature that makes the screen exceptionally responsive making all those slides and scrolls smooth as ever and secondly you have to love the brilliance of the BRAVIA Engine 2 that gives you increased image quality, sharpness, contrast and saturation for an enjoyable viewing experience. To top it off, the Xperia Z employs the Android v4.1 (Jelly Bean) OS to give you all you need from this phone.
To further impress is the 13 MP primary camera with 16x digital zoom and an LED flash. The phone has a 2 MP secondary camera and full HD video recording. With 3D Surround Sound, you enjoy mind-blowing clarity on the music and video players as well as the FM radio.
Design
Don’t let the sleek and compact body of this phone fool you. The glass fibre polyamide frame of the phone makes it super strong. The Xperia Z also has durable tempered glass on the front and back for resistance to scratches. The best design feature of all has to be that the phone is waterproof, so spilling your coffee on the phone while in a meeting may be embarrassing, but not costly. The design of the phone includes a 3.5 mm audio jack and a micro USB port.
Storage and Battery
When you have a phone with so many interesting features it’s going to be hard to put it down. To ensure that the enthused user is not disappointed, the Android Xperia Z is powered by a 2330 mAh battery that supports up to 11 hours of talktime on the 2G network and up to 14 hours on the 3G network. You can expect up to 550 hours of standby time on 2G and 530 hours on 3G. 16 GB internal memory gives you space for your photos, music and data and if you need more space you can expand the memory up to 32 GB using micro SD cards.
Connectivity and Features
Ensuring that your connectivity is always solid, the Xperia Z comes with GPRS, EDGE, 3G, Wi-Fi, and tethering via USB and Wi-Fi Hotspot. The phone also comes with Bluetooth and DLNA for wireless data transfer. The Xperia Z  has pre-installed apps like Facebook, Twitter, Gmail and more apps that make everyday activities easy and exciting.

Related Video


Where To Buy?


sony make believe logo

Sony Mobile Store locator

Our Sony Xperia™ Smartphones are available to buy through Retail Stores near you.
Sony retail shop locator

Online deals for Sony Xperia™ Smartphones

Indiatimes Shopping

Facebook Inc. offers many privacy options to its users.
The trick is knowing how to use them.

It isn't always easy to figure out, or to keep up with the changes the company makes over time.

Because of that, many users think that they're sharing information and photos on Facebook with close friends or family—only to find out that they have pretty much opened their lives to the world.

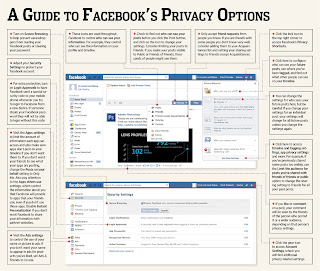
In addition to giving you control over who sees your posts, Facebook offers settings that will help prevent your account from being broken into, keep your name and picture from showing up in ads for products you've liked, and prevent apps from posting on your timeline.
Click To See Full Size Image


Again, these are all valuable tools, but only if you can make sense of them.

So in that spirit, this graphic points out some of the most important Facebook privacy settings and shows you how to use them.

Facebook last week unveiled a redesign, to be rolled out over the next few weeks, that will change the look of the home page and the placement of privacy and security icons. But the settings themselves will not change


The Xperia™ Z Advantage

Introducing the precision engineered full HD smartphone which packs 443pixels per inch on its wide 5 (12.7cms) screen. Its slim 7.9 mm body, with its reflective glass surface, looks and feels slick. Here are more innovations that Xperia Z brings in its slim & stylish package.


                             Meet the new Xperia™

3D Model of Xperia Z

Today we decided to present some cool jQuery Popup For Facebook Like Box With Timer for wordpress and blogger blogs.
This one includes a time counter and instead of likebox it displays a like button that links to your Fan Page and an attractive Image that also links to your fan page letting your visitors to either join your fan page by clicking the like button or by simply visiting your fan page by clicking the image. It also include a timer too! The JavaScript code for this plugin is created by kakiheboh termed as “LikeBox FB Fanpage Pro”. Installation is totally simple just follow following steps to add jQuery Popup For Facebook Like Box With Timer to WordPress and Blogspot blogs.


Adding Popup For Facebook Like Box for Blogger and Wordpress

You just need to place a code to your blog widget Follow following steps to add Like Box popup to WordPress and Blogger.
Adding To Blogger
  1. Go To Blogger > Design > Edit HTML
  2. Backup your template
  3. Paste the following code just above </body> tag
Adding To WordPress
  1. Go to Dashboard > Appearance > Editor > Header.php
  2. Paste the following code just above </body>
<style>#fblikepop {    background-color: #fff;
    display: none;
    position: fixed;
    top: 200px;
    _position: absolute;
 /* hack for IE 6*/
    width: 450px;
    border: 10px solid #6F6F6F;
    z-index: 200;
    -moz-border-radius: 9px;
    -webkit-border-radius: 9px;
    margin: 0pt;
    padding: 0pt;
    color: #333333;
    text-align: left;
    font-family: arial,sans-serif;
    font-size: 13px;
}#fblikepop body {
    background: #fff none repeat scroll 0%;
    line-height: 1;
    margin: 0pt;
    height: 100%;
}

.fbflush {
    cursor: pointer;
    font-size: 11px !important;
    color: #FFF !important;
    text-decoration: none !important;
    border: 0 !important;
}
#fblikebg {
    display: none;
    position: fixed;
    _position: absolute;
 /* hack for IE 6*/
    height: 100%;
    width: 100%;
    top: 0;
    left: 0;
    background: #000000;
    z-index: 100;
}#fblikepop #closeable {
    float: right;
    margin: 7px 15px 0 0;
}#fblikepop h1 {
    background: #6D84B4 none repeat scroll 0 0;
    border-top: 1px solid #3B5998;
    border-left: 1px solid #3B5998;
    border-right: 1px solid #3B5998;
    color: #FFFFFF !important;
    font-size: 14px !important;
    font-weight: normal !important;
    padding: 5px !important;
    margin: 0 !important;
    font-family: "Lucida Sans Unicode", "Lucida Grande", sans-serif !important;
}#fblikepop #actionHolder {
    height: 30px;
    overflow: hidden;
}#fblikepop #buttonArea {
    background: #F2F2F2;
    border-top: 1px solid #CCCCCC;
    padding: 10px;
    min-height: 50px;
}#fblikepop #buttonArea a {
    color: #999999 !important;
    text-decoration: none !important;
    border: 0 !important;
    font-size: 10px !important;
}#fblikepop #buttonArea a:hover {
    color: #333 !important;
    text-decoration: none !important;
    border: 0 !important;
}#fblikepop #popupMessage {
    font-size: 12px !important;
    font-weight: normal !important;
    line-height: 22px;
    padding: 8px;
    background: #fff !important;
}#fblikepop #counter-display {
    float: right;
    font-size: 11px !important;
    font-weight: normal !important;
    margin: 5px 0 0 0;
    text-align: right;
    line-height: 16px;
}</style>
<script src="http://www.google.com/jsapi"></script><script>google.load("jquery", "1");</script> 
<script type="text/javascript" src="http://connect.facebook.net/en_US/all.js#xfbml=1"></script>
<script type="text/javascript">
//<![CDATA[
 kakinetworkdotcom01username="WebKorner.org",
 kakinetworkdotcom01title="Join us at Facebook!",
 kakinetworkdotcom01skin="04",
 kakinetworkdotcom01time="20",
 kakinetworkdotcom01wait="0",
 kakinetworkdotcom01lang="en"
//]]>
</script>
<script type="text/javascript" src="http://cdn.allbloggingtips.com/wp-content/uploads/2012/06/popup-with-timer-codez.js"></script>
<script type="text/javascript">
//<![CDATA[
 $(document).ready(function(){$().kakinetworkdotcom({ closeable: true });});
//]]>
</script>

Make following important changes:

  • Replace this WebKorner.org with your Facebook username.
  • The timer is set to 20 seconds to change it simply edit timeout: 20
  • The widget appears immediately after a visitor enter your blog/site. If you want it to appear after one minute or more then edit wait: 0


Hey Friends here I present a Free hosting Giveaway.
Only Top 5 winners will get Free Hosting without ads.
Winners will be selected via http://www.random.org/
You can participate using the widget below

Most graphic designers don’t start from scratch. Very few graphic designers tend to start from scratch when they set out on their quest to design something, what tends to happen is that they have a browse around the internet to see what other people have created first to influence them before engaging in the design process.
Whether you’re an amateur or a skilled professional, it’s likely that when you engage in Facebook cover design you’re going to be influenced by the art work that you've previously seen or have previously designed yourself.
Consider using a cover template rather than just being influenced. But what if influence isn’t enough for the time or ability that you have on hand to create a cover? Then you should consider creating a cover for your Facebook using a template.

Make your own Facebook cover photos using a template

Facebook cover maker software utility is provided by provided by Make a Cover for Facebook which in effect uses template concepts to assist users in their design process.
The template infrastructure provided by Make a Cover for Facebook is somewhat remonstrant of what used to be provided as a method by which to create a websites for free using a “builder” app. Whilst it may appear disappointing to suggestions that this Facebook cover making utility could be associated with dated webpage building software, this free Facebook cover maker is implemented fairly well for all intense and purposes.
dolly-facebook-cover
When you visit the website of Make a Cover for Facebook you are lead into their app that provides a default Facebook cover arrangement of a character that you are invited to modify. So, in effect you are provided a ready-made template to modify. The cover modifications that you have available at your fingertips are fairly numerous, however I do like the way that when you click an accessory or facial pattern it is automatically applied and you don’t have to painstakingly place it into position.
You in effect make up your own Facebook cover by continuously updating the pre-defined template with your preferences as to how your cover should appear. So for example, if you select the penguin character as the basis of your Facebook cover – and you don’t like the hat, clothing or facial features – you can change each one in turn.
Something that I do appreciate is that this free Facebook cover maker doesn’t utilize Adobe Flash; I have similar sentiments to Apple here in that I find that Flash crashes my computer and isn’t the best.
Instead, this Facebook Cover Maker app users HTML 5 technology to implement its offering which is much faster, however you may need to upgrade your web-browser in order to use this tool.

Facebook Redesigned: How To Get New Design Facebook Home Page 2013
Facebook announced Thursday it is giving its venerable news feed a new look and feel. Big changes are coming to the Facebook News Feed, the social networking giant revealed in a press conference today.

The Facebook News Feed (the area of the site that holds all of your friends' and Liked pages' posts in a stream) will be given an overhaul, with a new interface that's "mobile-inspired" in its design that will turn Facebook into a "personalised newspaper", according to CEO Mark Zuckerberg. The aim is also to further align the look of the desktop version of the network and its many mobile variants.

The new news feed design was inspired by mobile. It takes significant cues from the Facebook mobile apps for phones and tablets, adding a new side navigation bar and more white space.
Click Here To Join Waitlist To Get New Facebook Home Page


Behind the redesign
Learn more about the thinking behind the new look.

Give it a try

Join the wait list to get the new homepage for the web. Look for it on your iPhone, iPad and Android soon!


Copyright © 2012 D3vil tech.